When I wrote stljs, a library to read, write, and convert STL to PNG, one of the things I had to decide was how to calculate where the camera was located and where to point the camera. You want to be able to be able to show off the model at angles where you can see the most detail. How do you do that automatically for any sized object of any shape? I’ll show you how stljs does it.
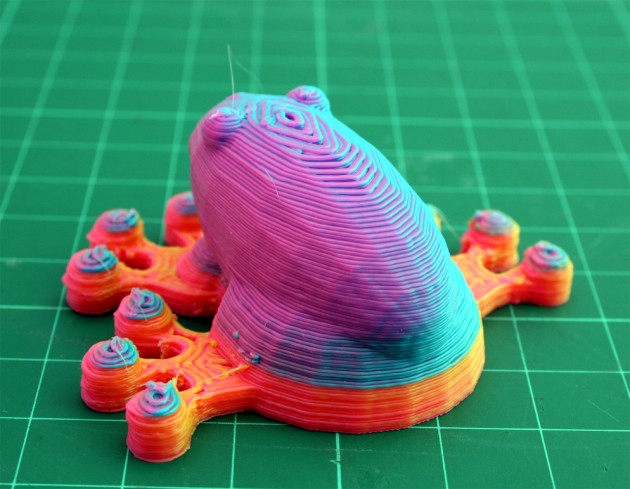
Shows models rendered at the right angle
The first time I wrote an STL to PNG converter, it was just a simple script. In my haste to get it done, I picked a simple heuristic: Find the bounding box of the model, place the camera at the corner of the box times a multiplier and point the camera at the middle of the model.
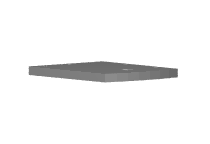
When it’s a flat piece, the angle is wrong
Turns out this wasn’t a very good heuristic for all types of models. For flat parts, you’d see an edge-wise view of the part. And for long parts, you’d see a length-wise view of the part. In both instances, the most interesting part of the model is in the flatter part. And in addition, if the model was offset from the origin, it was often outside of the viewport.
And for a long time, Cubehero suffered in its display of models as a result. Many uploaded physibles with interesting models weren’t apparent as a result. I’m happy to say this is no longer the case. Stljs now employs a different heuristic to show models.
When you hold an object in your hands, you often hold the longest dimension perpendicular to your line of sight, since most of the surface area, and hence information is along that dimension. So let’s define some formulas to help us look perpendicular to the broadside of an object.
I decided to use a spherical coordinate system, because it’s easier to think about the camera swiveling around the object. We’ll start with figuring out the formulas for r, θ (theta), and φ (phi) and converting them to cartesian coordinates x, y, and z.
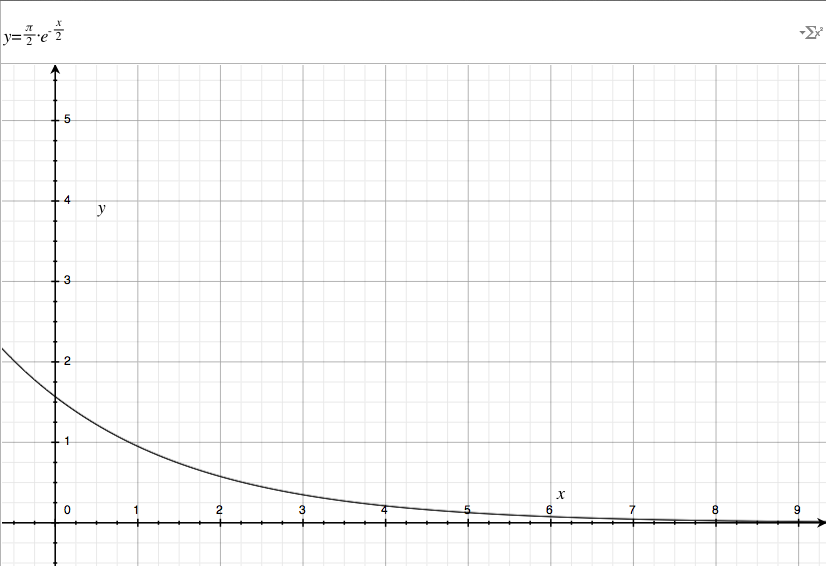
Let’s look at setting φ first. So if the part is flat, I want to be looking down at it. If it’s tall, I want to be looking horizontally at it. To tell how flat a part is, I decided to look at the ratio between its height (h) to its length (l) and width (w). When the ratio is high (the part is tall: h >> l + w), we want a φ ~= 0. When the ratio is low (the part is flat: h << l + w), we want a φ ~= 90. The range of the ratio is between 0 and ∞.
There’s only a few functions that would give us those characteristics, where there’s and inverse relationship between an input that is between 0 and ∞, and an output that is between 90 and 0. I chose the exponential decay function:
Phi = -π / 2 * e^(-h / (2 * (l + w)))
An exponential decay function fits the characteristics above, as well as the property of favoring an angled view of an object. If we pictured an object growing in height, but keeping a constant base, the camera would move quickly from a top-down view to an angled view, and then resist being completely horizontal as the object kept growing. I divided h by a factor of two to slow down this change.
Decaying exponential
Similarly, for θ, we want the same sort of exponential decay function:
Theta = -π / 2 * e^(-l / w);
We only look at the ratio between length and width. By the same principal, we want the theta so we’re always looking at the broadside of an object.
Now radius was a little more difficult. Different size objects required a different distance to look at them. For any one dimension of the bounding box, I knew I wanted a view angle of 36 degrees. Therefore, I ended up with:
Radius = dimension / atan(π / 5)
But since I wanted to take into account every dimension, I calculated the radius for each dimension and took the max of them all:
Radius = max(w / atan(π / 5), l / atan(π / 5), h / atan(π / 5))
This makes sure we’re far enough away to see the entire object.
Sometimes, people save the STL object that’s not centered. So we have to adjust the object with offsets determined by the bounding box. We find the middle of the bounding box, but on the XY-Plane (hence we don’t add h / 2 to Z), since we don’t want a floating object.
X_offset = BoundingBox.Min.x + w / 2
Y_offset = BoundingBox.Min.y + l / 2
Z_offset = BoundingBox.Min.z
Now that we can calculate the spherical coordinates, we need to convert it to cartesian coordinates. That’s pretty standard textbook that you can look up on wikipedia or derive yourself. We add the offsets because we want the object centered in our view:
X = Radius * sin(Theta) * cos(Phi) + X_offset
Y = Radius * sin(Theta) * sin(Phi) + Y_offset
Z = Radius * cos(Theta) + Z_offset
Last thing, we need to determine where the camera looks. It should look at the middle of the floor bounding box, but 1/4 * h off the ground.
Cubehero, like many other web apps, depend on background workers to get many tasks done that you don’t want to do within a web request. These are usually longer running tasks, like sending an emails, calculating a score, updating information from a remote source, or in the case of Cubehero, rendering 3D models as images (among other things).
Whenever you upload files, either through the web interface or through git, it triggers code that finds files that need to be processed as a job. For example, when a new set of files are committed, we find any STL files and create a job to render the 3D model for each file.
However, not all jobs are independent of each other. Some jobs can only be run when others have been fully completed. For example, the rendering workers need an up-to-date copy of the file before they start rendering them. Then image files, regardless of whether they were generated or uploaded, need to be resized.
As we expand support of different file types, this overhaul of background workers will help make it easier to generate the images and data needed to render a web page. When the work is done ahead of time, you have a fast web experience.
Ever want to parse STL files, but couldn’t find a fast library to read both ASCII and Binary STL files? Or you have STL files, but you want to convert it to an image, so you don’t have to load a 3D model on your webpage?
The library allows you to read both binary and ascii STL files. It currently only writes to ascii files (but that will be added later). It is currently only for node.js, but eventually, it should be available for the browser.
The methods to read the STL files also have a progress callback, so you can process the polygons as they’re being read.
stljs = require('stljs')

stljs.readFile('teapot.stl'
  , (err, solid, name) ->
    # finished parsing can now do stuff with solid
  , (err, polygon, name) ->
    # gets called on as each polygon is parsed
)
But in addition, you can render STL files as PNG images, but the method depends on pov-ray being installed on your system. Then, you will be able to convert it like so:
stljs = require('stljs')

stljs.imageify('teapot.stl', { width: 200, height: 100, dst: 'teapot.png' }
  , (err, povOutput, name) ->
    # done with converting the image
  , (err, povPolygon, name) ->
    # called on each polygon is processed
)
If you have contributions, feel free to fork and send pull requests. Enjoy!
Cubehero isn’t just the web page itself. It depends largely on background workers to do the work of rendering models to images, resizing images, and visual diffing models. The past three weeks have been an overhaul of the system to better support background workers.
For you, the user, this means being able to see clear representations of the files you’ve uploaded. If it’s a photo, you get different sizes of the photo. If it’s an STL file, you see an image of the rendered model. Even if you don’t upload a photo for your physible, you will see image of the model.
We can render a model to provide image previews
So how do you render or convert STL files to images? Here, we’ll detail a manual way to do it. Soon, we’ll release a library that does this for you.
To convert STL files to images, you use programs called raytracers, which take a 3D model or scene, and render it as a picture. They do this by modeling how light bounces travels from a light source, bounces off an object, and gets captured by the camera. Raytracers are pretty sophisticated programs that can generate very realistic scenes, but for us, our models and scenes are relatively simple, so they don’t take very long.
There are different ways to do this, but here I’ll detail the manual way to render images from STL files. We’ll be using a raytracer called Pov-ray. If you’re on a mac, you can install it using homebrew.
brew install povray
If you’re using ubuntu, you can install it using aptitude
aptitude install povray
However, povray doesn’t directly read STL files. We’ll need to convert them into a format they can read, which are POV files. POV files can contain both the data of the model, and the instructions of how to render the scene, such as how much lightning, and what position and angle to put the camera.
A tutorial on the ins and outs of a POV file would be beyond the scope of this post, but we can start with a simple one. First, we’re going to put the data and the rendering instructions different files for clarity. We’ll put the data in a file called ‘my_model.inc’, and then include it in ‘my_model.pov’, which contains the rendering instructions of the POV file.
We can data dump the STL file into my_model.inc by using an old C program called stl2pov. Download the project and compile using ‘make’. Then use the compiled executable stl2pov to convert your STL to a POV include file with:
stl2pov my_model.stl > my_model.inc
Next, we declare the rendering instructions for the POV file, called ‘my_model.pov’. Open up ‘my_model.inc’ with a text editor, and note what name it declares the model. In my case, it’s ‘m_OpenSCAD_Model’. You’ll need to replace ‘m_OpenSCAD_Model’ with the name of your own model in the ‘my_model.pov’ below.
And that’s it! Enjoy your new image. If you’d like to change the angles and the lightning, change the parameters in ‘camera’ section in ‘my_model.pov’. For more, try the documentation on pov-ray. If this all seems like a hassle to do manually, we’ll have a library that does this for you soon.
So you’ve decided that you want a home/desktop 3D printer. But like the early days of personal computers, there’s been an explosion of different 3D printers out on the market. There’s about 120 different desktop 3D printers available in 2013. Until the market decides on clear winners, there will be more to come.
Which 3D printer should you buy? That mostly depends on why you’re buying one and your budget.
Since there’s different printers all the time, any review or recommendation given here would quickly be outdated. It’s better to learn what you need to know about buying a 3D printer, learn some tips, and make your decision based on that.
Primary Considerations
To start, there’s really only four things you need to consider:
Am I going to have more fun building the printer, or printing things?
What’s my budget?
How consistent is the printer, and what’s the quality of the prints?
How fast can my printer print? (while keeping quality of prints up and costs down)
Tinkerer or Designer?
Are you a tinkerer?
There are many different reasons to get a 3D printer, but currently, those with 3D printers largely fall into two groups decided by a single question:
Do you want to tinker with the hardware, or are you more interested in printing things you or other people designed?
Some people are drawn to 3D printing because they like hardware or mechanical machines and would like to build their own from scratch, from kits, or design one of their own. For them, the fun of it all is the actually building of the machine. Many of the kit-based 3D printersare also open source, meaning the design and the bill of materials is available for you to make changes to the design and contribute changes back. To save on costs, it’s also possible to source the materials yourself through online suppliers, such as McMaster-Carr, Amazon Supply, and eBay.
If you fall into this group, it’s best to focus on printers that come as kits, low cost, with a relatively large community to ask questions when you run into snags. Hang out at various 3D printing communities on google groups or google plus, and see what 3D printers people are talking about.
The MendelMax 1.5
The RepRap family of 3D printers are the poster child for DIY 3D printing. Specifically, the MendelMax 1.5 comes to mind, as a DIY 3D printer that’s pretty solid as well as easy to assemble.
Other people are drawn to 3D printing because the ability to build anything they can imagine–or better yet, things that other people imagine. For them, the fun is to explore what you’d be able to print with a 3D printer. Some people print functional art and desktop ornaments. Other people use it to prototype board game pieces, hardware enclosures, or product concepts. And yet other people print functional objects to fix and solve their problems around the house.
Or do you like to print things?
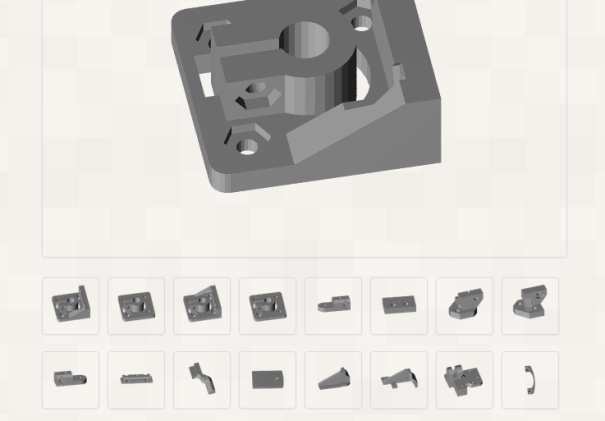
To see what other people have imagined, you can visit our site, Cubehero.com to see what people are hosting. Other notable places to check out are GrabCAD.com and Thingiverse.com
If you fall into this group, it’s best to focus ease of use, consistency and speed of prints. This will mean you buy pre-assembled 3D printers, with some semblance of customer support.
Makerbot Replicator 2
Makerbot Replicator 2 and Ultimaker are the two commonly purchased pre-asssembled printers. For Makerbot Replicator 2’s, you may be able to get a printer with a similar performance for a lower price.
What’s your budget?
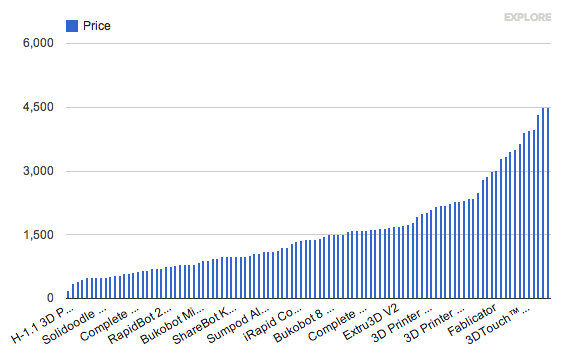
The cost you’re willing to pay for a 3D printer will figure heavily into what kind of printer you will buy. As a rule of thumb, kit-based printers are cheaper than pre-assembled printers, and self-sourced printers are cheaper than kit-based printers. However, there are solid pre-assembled printers available for $500 to $800.
Distribution of 3D printers by price (Click to explore in interactive graph)
As of 2013, you should be able to get a good pre-assembled printer with for around $1500 or less. For $2000+ printers, look for something that makes it stand out from the sub $2000 printers. Examples are one or more of the following: solid metal frames, a flat build platform, speed of print, belt-less drives, straight metal guides, easy to use software.
There’s many things that factor into ease of use (the software for one). However, consistency of the print is one of the biggest contributing factors. Early desktop 3D printers had easily failed prints, and there’s nothing more frustrating than restarting a print. As of 2013, failed prints are far more rare, but they still do happen, largely due to the design of the printer.
First factor in consistency is the flatness and the levelness of the build platform. 3D printers regularly print at layer heights of 0.1mm, which means that if there’s warping in the build platform of more than 0.1mm, the first layer isn’t going to stick well in different places. Then, it’s likely going to peel off and warp the print, or worse, get knocked off the platform. The best way to discover if a printer has this issue is to view their community or support forums, and see how many people complain about it, and how the company responded to it.
Secondly, all desktop (as well as most commercial printers) 3D printers are open feedback systems, meaning there’s no feedback back to the onboard computer where the toolhead is once the computer issues the command to move to a position. The ability to travel to the same point in 3D space consistently therefore depends on a combination of stepper motors, a solid frame, drive systems, and the overall design of the printer.
Printers with a solid metal frame will tend to vibrate less when printing at high speeds, so there will be less resonating waves that show up in the prints. Printers with a direct drive system or leadscrew drive system, as opposed to a belt and pulley drive system tend to have backlash when changing directions, and hence a more accurate X-Y resolution. (To be fair, leadscrews also have a bit of backlash).
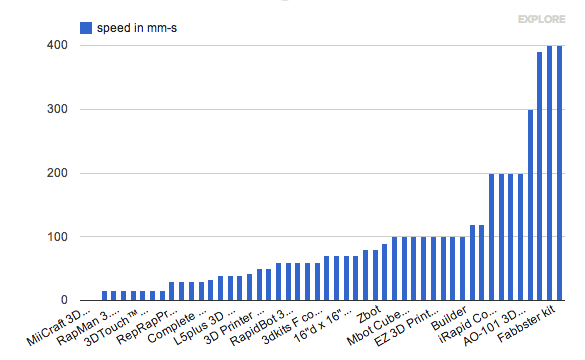
Generally, there are two measures of print speed. There’s the print speed–how fast the toolhead moves when it’s laying down plastic. And there’s the travel speed–how fast the toolhead moves when it’s moving between printing areas without laying down plastic.
Distribution of 3D printers by speed
Many 3D printers now employ acceleration/deceleration firmware on the toolheads to achieve higher print speeds. The toolhead’s path often consists of abruptly changing directions, and without acceleration, it would shake the 3D printer apart at high speeds. For example, the Makerbot Replicator’s official print speed is 40 mm/s, but I’ve been able to run it at 80 mm/s with acceleration without a decrease in print quality.
Notable speedy printers are the Ultimaker ($2k+, kit: $1.5k) and the TrinityOne Aluminatus Pro ($3k+), both clocking in at around 400 mm/s.
Rostock Max
Delta printers are based on pick and place robot designs that tend to have really fast performance. The Rostock Max (kit: $999) clocks in at 300 mm/s, and as evident by pick and place machines, they can only get faster. The first delta printer to arrive on the scene with a significant following is the Original Rostock by Johann Rocholl. His next iteration is the Kossel.
Secondary considerations, but still worth thinking about
Free as in Freedom
Decades of closedness and sitting on patents by commercial 3D printing companies haven’t seen much progress in the desktop 3D printing space. As a result, many in the 3D printing community value openness and the sharing of ideas, progress, and credit. If this is a value you share, you might want to buy 3D printers that support it.
Lulzbot AO-101
Lulzbot AO-10x series is based on the MendelMax, which in turn is based off of RepRap family of machines. They’re open about their support for the open source 3D printing community, especially after Makerbot closed the source of their new Replicator 2 when their previous printers have been open source. The community has had nothing but good things to say about the company’s customer support, and involvement in the community.
Printer Community
The community around a 3D printer is also important, especially if you’re building it from a kit. For any printer you’re about to buy, see if you can find an active community discussing the printer and whether the company has a good customer support system in place.
Layer Height and Print Resolution
There’s a large misconception on the resolution needed for an object to be useful. Some people imagine something wouldn’t be useful or beautiful unless an object looks like injection molded parts. That’s simply not true.
20 micron print
Today’s desktop printers can easily achieve 100-150 microns layer heights. While the grain of the print is still visible, it feels like running your fingers up a stack of fine paper. Hobbyists have also been able to achieve 20 micron prints. The orange thing you see on the left side of the picture is someone’s thumb. However with Fused Deposition Modeling (FDM) printers, the higher the resolution of the print, the more time the print will take to finish.
There’s a a couple stereolithography (SL) desktop printer on the market right now. One is the Form One, and the other is the B9Creator. Its resolution is unmatched by FDM machines, but it requires a post-processing step to harden the print.
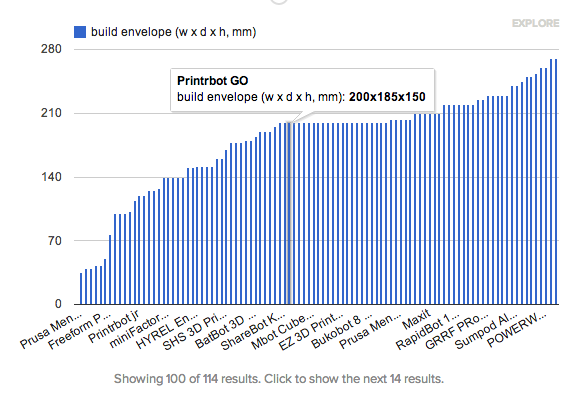
Build Volume
The build volume is a specs often touted in the marketing materials of various 3D printers, but in reality, beyond a certain size, it’s a feature with diminishing returns.
The advantage of having a huge build volume is that you can print large parts without having to digitally cleave the model. In addition, you can also print lots of different parts at once.
Click to explore
Since most 3D printed parts of any significant size takes hours to print, most people print medium sized objects. Given that your build platform can accommodate most objects, beyond a certain size (200mm x 200mm) it a feature with diminishing returns.
Types of materials
For desktop printers, there’s only a few plastics in use, ABS and PLA. Most 3D printers use filament spools that are interchangeable. The only exception is the Cubify Cube from 3D Systems, which require special Cubify only cartridges, even though it’s still ABS. So unless you have a Cubify printer, there’s no lock-in of plastic filament between different printers. So unlike inkjet printers, the materials is relatively cheap. ABS and PLA plastic filament is around $30-$50/kg, which will probably last you two months even if you print regularly. I personally have found Octave Filament to be a good source for filament, and they also sell through Amazon.
The cost in 3D printing is not the materials, but the time it takes to print things. Weighed against your budget, you should try to get the fastest printer you can afford.
Method of printing
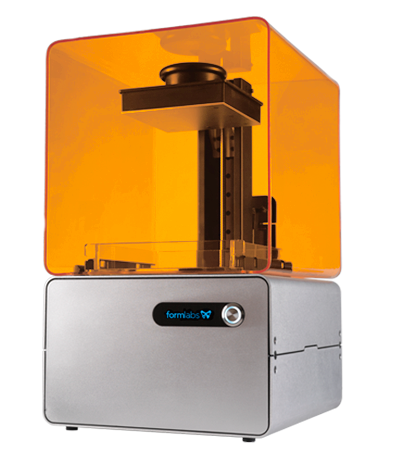
Form labs One printer
Almost all desktop 3D printers are FDM printers. This is because the patent for FDM printers has expired in 2009. Notable exceptions are Form One SL printer and the PDWR powder-based printer. Unless you specifically need an SL or powder-based printer, most desktop printers are FDM printers.
Where to go from here?
By now, you should know what to look for in a 3D printer. Further references to help guide your decision is, The Ultimate Guide To 3D Printing. It costs money, but well worth the money for their in-depth reviews. You would also do well to check out Engadget’s buying guide if you’re still reading this in 2013.
Good luck in your search for a 3D printer, and lemme know if this guide helped at all.
Update:
I found this post from the Invention Studio in Georgia tech, where they operate a small farm of 3D printers. They inadvertently have reviews of all the printers they operate for reliability. So far, the LulzBots AO-10x comes out on top for them.
In parallel with Tinkercad, we continued development of the core platform. In October 2012, we launched a scripting interface for one of the key components, the Gen6 geometry modeling kernel. And finally, in late 2012, we had several major breakthroughs in our research work on the core platform that opened up application possibilities we had never imagined possible.
In response to these breakthroughs, I’m excited to announce an updated roadmap. There are two major parts to the new roadmap: 1) we are working on an innovative new simulation environment called Airstone, and 2) we will be discontinuing development of Tinkercad. You can read more about Airstone in the official announcement.
Tinkercad announced they were shutting down and pivoting to a different product, which was a disappointment to many users and fans of the easy to use CAD software for the masses. It honestly came as a surprise to me, as it seemed like they had people that loved their product, and they were growing as the market for 3D printer grows. So it had me wondering, what did they learn that dissuaded them?
I believe their original observation was correct: in order for 3D printing to go mainstream, the tools for making 3D models needed to be much simpler than what was available. Without TinkerCAD, your choice was either professional high-end CAD programs like Solidworks and AutoCad, or Open source and/or free alternatives like Sketchup and Blender. None of the above is easy for someone to just pick up [1]. It seemed like there was a burgeoning market for easy to use CAD programs created by people with 3D printers.
The question then is, are people willing to pay for it? As it turns out, the answer is no. Users did want an easy to use CAD program for their 3D printers, but not at $20/month, or $240 a year. At first, this surprised me, as $240 a year is a heck of a lot cheaper than a standard Solidworks install at $7k [2], and much better than any free alternative for beginners in terms of usability. If so, why didn’t I pay for it?
When I think about monthly paid software, it’s usually for storage (Dropbox), for access to features (Olark), for access to other users (Okcupid), privacy storage (Github), or for ongoing maintenance and ops (Heroku). The aforementioned have in common a perception (real or imagined) of an ongoing service being provided that changes with time. Most people think of TinkerCad as a 3D modeling tool–essentially an editing tool. All text editors or 3D modelers have historically been free or sold as a one-time payment.
As a result, I’m guessing TinkerCad ended up falling into none of these categories that the end user perceives as an ongoing service. So when a potential customer is doing the calculus of whether this is worth their money, they’re likely to say no, even if they love the product.
I’m guessing TinkerCad charged monthly because from their end, they were providing an ongoing service: the Gen6 engine. When you stop to think about it, rendering 3D objects at scale regardless of the number of users or complexity of the model is no small feat. I don’t know what their server bill is, but I’m guessing between non-paying users and the server costs, they realized quickly it wasn’t sustainable. Even though they raised $1 million, that doesn’t go very far after you hire a couple engineers (about $100-$150k each).
When a startup looks at their metrics and doesn’t see growth in users or in revenue that leads to a repeatable and scalable income, something needs to change or they’ll run out of money and die. This change in strategy is usually called a pivot, and it can be done in a number of ways.
One way is to keep your customers, but find some other way to service them. An example would be how Flickr started off as a social game, but when they noticed their users mostly sharing photos, they turned into a photo sharing site.
Another way is to keep the tech that you developed, but find a different set of customers that’s a better fit. I believe this is what TinkerCad did by turning to Airstone. TinkerCad was being run by an incredible Gen6 parallel geometric kernel, and it decided to apply it to a different set of customers that would be willing to pay for their services. I think their decision to service users with simulation needs makes sense: those end users perceive fluid simulation as an ongoing service, and would probably pay a monthly subscription for it.
All in all, I think TinkerCad’s decision was the correct one for them. And they’ve handled the shutdown well, with plenty of time to migrate and export your data.
The market has spoken, and it does not want to pay a monthly fee for easy to use CAD modeling. How this will hurt 3D printing from moving forward will remain to be seen.
So where does that leave us, as we still have a need for an easy to use 3D modeling tool that’s moderately priced? Not with many viable alternatives. If you’re into programming-based modelers, there’s OpenSCAD, RapCAD, and CoffeeSCAD. If you’re into Open Source modelers, there’s Blender. If you’re into free modelers, there’s Sketchup. If you’re aware of other alternatives. Please let me know.
Edit: It’s not possible to open source TinkerCad without open sourcing the Gen6 engine. Given that they want to do Airstone, the Gen6 engine is what gives them a leg up on other simulation companies. Open sourcing Gen6 wouldn’t make sense in this case, as much as we’d love it. Without Gen6, TinkerCad cannot calculate the resulting 3D model after you union all the shapes and cut out all the holes and grouped them together. So unless you’d want to write your own geometric kernel to back TinkerCad, you’re out of luck.
[1] Many kids use TinkerCad. I’m not sure Solidworks, AutoCad, and Sketchup can say the same.
[2] Solidworks and AutoCad have expiring versions for free or student versions for $180 or so. Many of us aren’t students.
Recently, at parties, 3D printing always comes up when people ask me what I’m working on. I’ve found that people’s reactions to 3D printing vary greatly, and when talking about any new idea, there’s a lot of misconceptions about what 3D printing can and cannot do, and hence, subsequently, what it’s good for.
Given you want to wow your next date (haha), or draw the rapt attention of your fellow party goer, here’s some questions I get commonly asked at parties:
What is 3D printing and how does it work?
3D printers are machines that print physical objects when you give it a digital 3D model. With 3D printing, you can make real, physical objects from digital 3D models. It does this by building the object layer by layer, from the bottom to the top.
Most of the home desktop 3D printers use a technique called Fused Deposition Modeling (FDM), which essentially is a hot glue gun that melts and extrudes plastic through a moving toolhead. There’s other kinds of 3D printers that use different techniques, but the idea is basically the same: we build an object layer by layer by adding to the object–additive manufacturing.
This is in stark contrast to CNC machines, laser cutters, and sculptors, which start with a block of raw material and cut away from it to get the final shape. The advantage of additive manufacturing is that you can make fairly complicated shapes that would be impossible with subtractive manufacturing techniques.
Why the hype recently about 3D printers?
3D printing has been around since the 90’s, but recently certain patents on 3D printing have expired in 2008, allowing hobbyists and researchers to make 3D printers for themselves, on the cheap. There is a project called RepRap, whose goal is to make a 3D printer that can eventually print all its own parts. As a result of the openness of the Reprap project, many hobby-ists learned how to make 3D printers and some went on to found companies to buildandsell3D printers of their own design.
With thegroundswell of activity by 3D printer enthusiasts and designers alike, the media has covered it breathlessly (and on Stephen Colbert). It’s captured the public’s imagination about having Star Trek replicators in the home. It’s both attracted a lot of unfettered optimism along with crushing cynicism. The reality of home desktop 3D printers is somewhere in-between.
What do people print with it?
For commercial and industry printers, there seems to be a few main thrusts. 31.7% of the prints are parts or prototypes for motor vehicles. The second most common are parts and prototypes for consumer products at 18.4%. Then coming in at around 8-10% are all the others, most notably medical and aerospace applications. [source] In reconstructive surgery, some companies are printing exact molds to fit someone’s face, be it a jawbone or ears. In aerospace, some companies are printing strong, but lighter parts for planes, which results in fuel savings.
For the home-desktop printers, it’s spread more evenly across categories. I’ve thought about how to answer this, and the closest I’ve been able to come up with is: People print things that you can imagine, and all the things that you can’t.
At first, many people made upgrade parts for their 3D printers, contributing back design improvements and upgrades to their printers akin to how developers contribute back in open source software. But then people expanded and made functional items, from shower curtain rings, soap dishes, cookie cutters, to shelving brackets. Hardware and gadget enthusiasts also print creative covers for their iphone and their arduino/raspberryPi projects. People make figurines, toys, miniatures, and personalized rings.
But then people make all the things that you couldn’t imagine. One popular piece people print is the heart gears. It’s a function piece of art, where a heart is composed of gears. When the gears turn, the heart deforms until we make two revolutions, which by then, the heart is whole again.
Designers using Shapeways service have printed dresses and bikinis in experimenting of 3D printing and fashion.
Controversially, people are also experimenting with printing gun parts. The lower receiver for the AR-15 has been printed and they have been able to fire off a couple rounds. However, with the groundswell of imagination and attention about 3D printers by the public, national tragedies in gun deaths, and gun control laws under review, this makes for one aspect of 3D printing that has much attention. However, in reality, being able to print fully functional guns is not easy, and will still take years to figure out.
There are different places you can look to see what sort of models people are printing and sharing. Thingiverse is a site run by Makerbot, and are by far the largest collection. My own site, Cubehero is also hosting 3D printed models, but is focused on collaboration and version control. Defcad.org is a place for gun enthusiasts to host their models, since no other hosting site will host them. Shapeways is another place with 3D models to browse, but you can order and sell 3D printed items either you or other people have designed, printed in a variety of materials. There are other sites, but I’ll leave that for a another post.
With home-desktop printers, it’s currently mostly limited to four different kinds of plastics: ABS, PLA, PVA, and Nylon. However, there are also experiments on printing circuits with metal-alloys with low melting points, and conductive plastics.
How much do the materials cost? Is it worth it compared to buying it in the store?
I can only speak to printers that use plastics, which is mostly the home desktop printers. The plastics cost about $40-50 / kg spool. There is water soluble plastic for printing support plastic that costs $90 / kg however. The amount of plastic used per part depends largely on the part, but usually no more than about a $1.
If you can already buy it in the store, it’s almost always not financially worth it to print it yourself. Mass manufacturing and the worldwide shipping supply chain is pretty efficient. However, 3D printing’s strength is in making products that are personalized, one-off things, or things you can’t buy on the shelves anywhere.
Because of this, people often get stuck on thinking about what 3D printers can print that already exist. The real question to ask is, what can they makethat doesn’t yet exist?
What are these different materials and how are they different? How sturdy are the plastic parts?
There are mainly four types of plastics in use by home desktop printers: ABS, PLA, PVA, and Nylon. Each plastic has different properties and are used for different things.
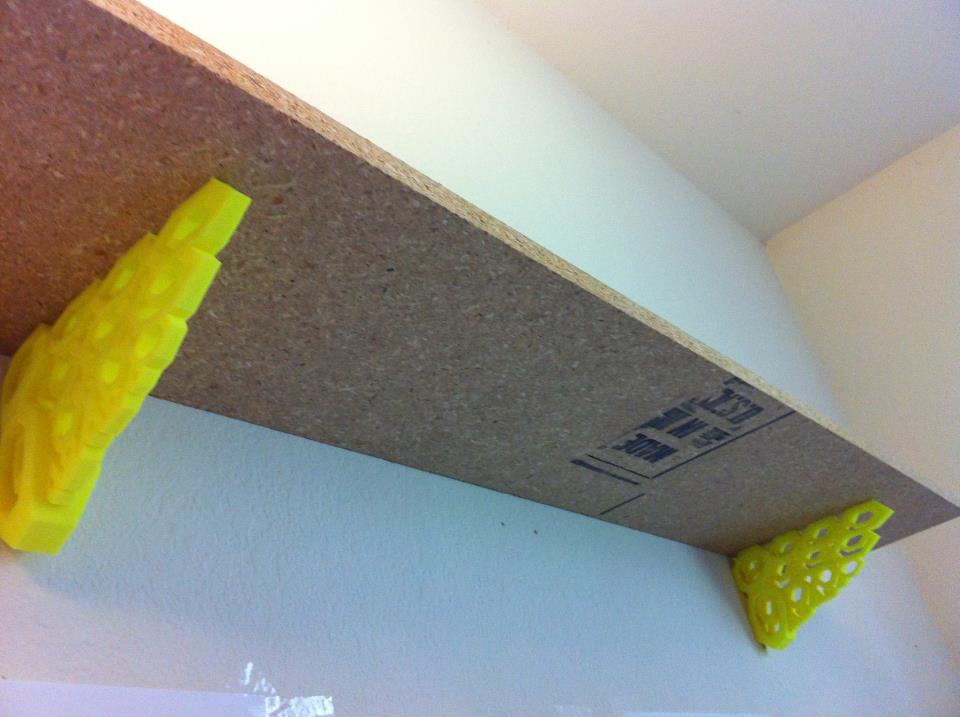
ABS plastic is the most common in use. It’s the same plastic that legos are made out of. The material is pretty strong, and I’ve been able to build shelving brackets with it. It can be tricky to print with ABS since it deforms a little when cooled, but there are ways to combat it.
PLA is a biodegradable plastic made from corn starch that has a lower melting point than ABS and snaps under stress, rather than deform, like ABS. It can be easier to print with than ABS, but it has a higher heat retention, meaning you’d need to cool the plastic as your print it to get it to keep its form.
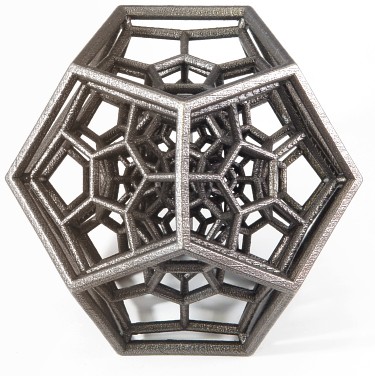
PVA is a plastic dissolvable in warm water. Because 3D printed objects are built upon the previous layer, it can’t print overhangs lower than 45 degrees. We can print these models by first printing support structure, and then dissolve the structure in water. This can be especially useful in complicated models with overhangs, like the 120-cell.
Nylon is a flexible plastic with a higher melting point, that results in flexible pieces. One application is for iphone cases that are more flexible.
Can you reuse the plastic?
Yes. For ABS and PLA, you can remelt failed prints into filament, and then reuse them again. As of March 2013, there are two projects I’m aware of that melts plastic pellets and extrudes a consistent diameter filament. Filabot is a kickstarter project, though I’ve not heard word on what their status is. Recyclebot is a DIY project that the author has been improving steadily, currently at v2.3. Lyman Extruder is another filament invented by an 83 year old.
I believe there are some experiments with recycling milk jug plastic, but different plastics have different properties, and not all of them are conducive to 3D printing.
Can you print in multiple colors?
For commercial 3D printers, yes, depending on the material. Commercial 3D printers are able to print a type of sandstone or gypsum by using an liquid bonder to bond powder together. During the bonding process, it’s able to inject ink to color the object.
For home desktop 3D printers, the answer is: sort of. The Makerbot Replicator and the Replicator 2x has dual toolheads that you can load different colored plastics. Then as the printer is printing the model, and it needs to switch colors, it uses the other toolhead.
As of this writing (March 2013), however, there has been some experiments on mixing different amounts of different colors to produce a spectrum of colors.
What’s the resolution on an object you can print?
Most desktop 3D printers can easily achieve a layer height of 100 microns. If you run your fingers across it, it feels like a stack of paper. Hobbyists working on the edge of 3D printing hardware have been able to achieve a layer height of 20 microns. If you look at the picture below, that’s the 3D print on the right, and a thumb on the left. However, with FDM printers, it’s a tradeoff between the speed and the resolution of the print.
There are two home-desktop printers that have quite high resolution by using a technique besides Fused Deposition Modeling (FDM). The Form 1 printer uses Stereolithography (SLA), which uses a laser to cure and harden a resin. The PWDR printer project uses a liquid binder to fuse white gypsum powder together.
How much does it cost per print? How long do the prints take?
The answer the both questions depends largely on the model, the resolution of the print, and the printer you’re using. For something about the size of a rubik cube, the cost of the plastic is only $1 or 2, and might take 2 to 4 hours. If one buys ABS pellets and melts them into filament yourself with one of the plastic recyclers mentioned above, then the price drops dramatically. If the resolution of print is low, then it will print much faster.
Lastly, the design of certain printers enables it to make faster prints. The speed of printers as of this writing (March 2013) is tri-modal: one set is grouped at around 150 mm/s, the second at 80 to 100 mm/s, and the last set at 40 to 50 mm/s. The linear speed of the toolhead when it has to move between areas without extruding plastic also helps determine speed of the print. There are some home desktop printers that have a speed of 300 mm/s.
How much is a 3D printer?
Commercial printers are at least $10k. But home desktop printers are about the cost of a computer. Kits that you put together yourself are available for as low as $500. Most assembled printers are around the $1500 range, but there are a few that are around $800, and an outlier, the printrbot Jr. at $400. However, at the high end, they are around $2000 to $2500.
In Conclusion
There’s actually quite a number of other topics not yet covered, such as copyright issues, novel uses and services, and future implications. But armed with the above, you’re well on your ways to being the life of the party! (haha)
Follow me on twitter, if you’d like to learn more.
Hopefully this finds you all well. This holiday season had been both a time of reflection for myself, as well as some improvements for Cubehero.
Web-based upload and commit
I’ve listened to your feedback, and changed the way you can push files to Cubehero. While you can still use git, you can now upload files directly from the web.
You simply select files that are new or have changed with the file chooser. Write a short description of what changed, then upload the files.
While the files are uploading, there’s a progress bar telling you about its progress. When all files have finished, Cubehero will commit a new version for you.
After the commit is done, you’ll be redirected to a gallery of the current files in your repository.
Bill of Materials Experiment
About a month ago, I did an experiment making a Bill of Materials for the Rostock 3D printer. I’ve since made the feature available to all projects, though data entry involves writing JSON, which means it can also be version controlled. When you change the quantity or the supplier, it will automatically update the amount. If a bunch of you are clamoring for this as a useful feature, I’ll make the data entry easier than entering JSON.
Hope this all finds you well. As always, if you have any difficulty or need help, don’t hesitate to ping me: wil@cubehero.com. Take care!
Wil
Hope you had a good mid-autumn festival. What’s been going on? To start, I believe when people want to share their projects, they not only want to have the files up on the web (any FTP can do that), but they’d like to share it beautifully and clearly. When you have a clear proposition and layout of your project, it helps attract collaborators to your project. I’ll be working on more benefits for sharing when you host your project on Cubehero.
Photos can say a lot
Unlike software, 3D objects are visual by nature, and hence, a great photo can do wonders to attract and gain the interest of others to your project. I’ve added photo uploading to your project and put it front and center. Check it out
Markdown flavored instructions
When you have a project, documentation is important. It’s not only important to describe your project, but also to give helpful instructions on how to print and put it together. If you push a file named README.md in your root directory, Cubehero will render it in all its Markdown glory. Check it out
Pan, Tilt, and Zoom
The model render is an important aspect of being able to see your models and their diffs. I’ve revamped the guts of the renderer, so now you can pan, tilt, and zoom with your mouse. In addition, it now has front and back lighting, the viewer adjusts to the size of your model, and some bugs with unlit models were fixed. Check it out
Password caching tip
Psst. Don’t want to enter in your password every time you push? Try github’s password caching.
Well, as always let me know if you have any problems or questions. I’m at wil@cubehero.com, and you can also find me on Olark, the web chat on the bottom right hand corner on Cubehero. Until next time!
Wil
Welcome, new Cubeheroist! To help you get started, I wrote a quick little walkthrough to help you out. To follow along, you need both git and openscad installed.
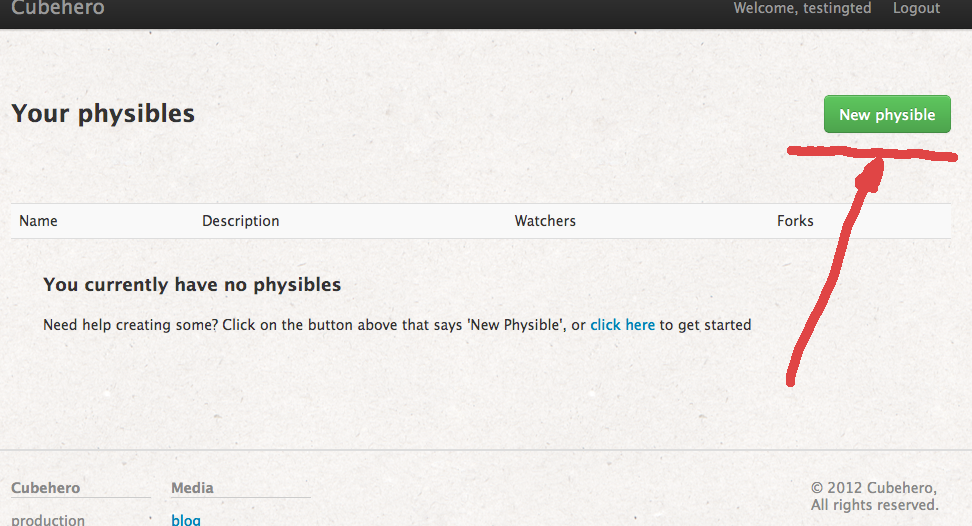
First signup for cubehero. It’s standard fare–choose a username/password, etc. Then once you’re in, you’ll see a green button to create a new physible. Click it.
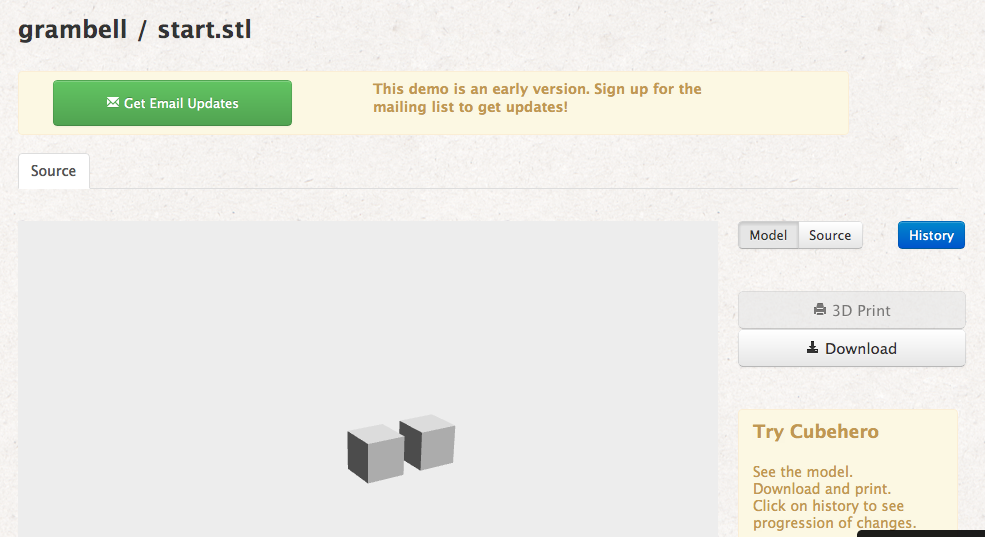
Now, you can create a name for your physible and a description. For me, I’m making a dumbbell.
Then I bring up the terminal and start typing in commands at the prompt (type only the commands in bold). Make sure you replace `[enter your username]` with your own username below:
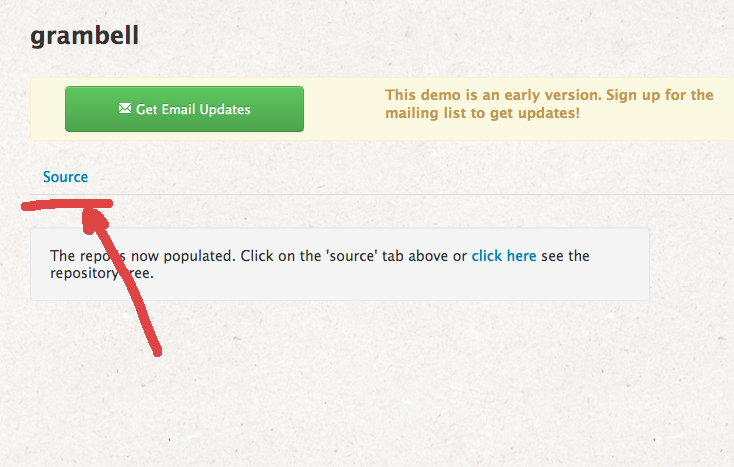
> git clone https://cubehero.com/[enter your username]/grambell.gitCloning into grambell...warning: You appear to have cloned an empty repository.
That’s ok, because it’s not going to be empty for long.
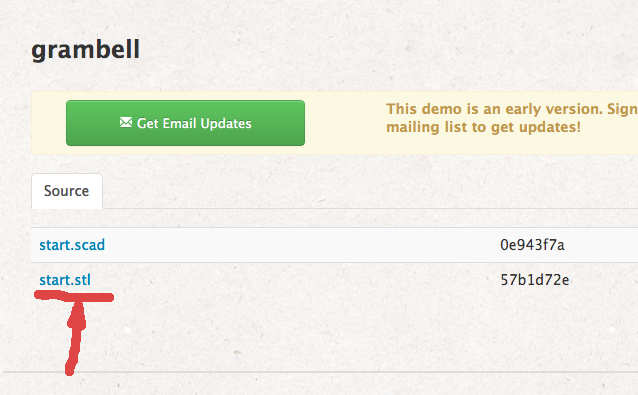
Here, we used openSCAD to compile an STL file. We’re ready for our first commit! Let’s see what we changed:
> git status# On branch master## Initial commit## Untracked files:# (use "git add ..." to include in what will be committed)## start.scad# start.stlnothing added to commit but untracked files present (use "git add" to track)
Looks good! First we add the untracked files to staging:
> git add .> git status# On branch master## Initial commit## Changes to be committed:# (use "git rm --cached ..." to unstage)## new file: start.scad# new file: start.stl#
Work on 3D printed projects together.
Host your 3D printed projects on Cubehero, and get 3D Model previews and git based version control. https://cubehero.com