Earlier, I showed you how to extrude images in OpenSCAD, and a beginner’s guide to OpenSCAD. This time it’s a more advanced method on how to emboss images onto a surface in OpenSCAD, which requires some understanding of how to use the command line, and a little bit of Ruby.
Sometimes, half the fun of 3D printing is being able to take other formats and convert them into something printable. In this case, we want to be able to convert an image into a surface, a process called embossing.

Embossing is where we take an image and raise the surface on the lightest parts of the image. Impressing is the negative image of embossing, more like stamping an image onto a surface.
To do this, we’ll use the surface() command in OpenSCAD and a command line tool called Imagemagick. If you don’t currently have Imagemagick, go install it, depending on whether you’re on linux (ubuntu), mac (or using binaries), or windows.
Once you have that installed, we can use imagemagick from the command line to convert our image to grayscale.
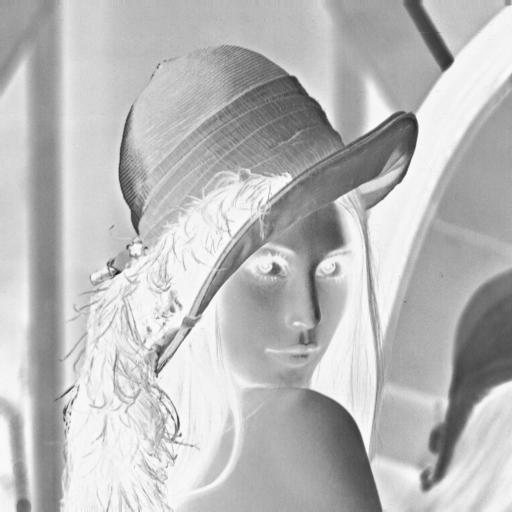
We’ll use the classic sample image from the field of image processing, lenna.png.

To convert this to grayscale, all we have to do on the command line is:
convert lenna.png -type Grayscale lenna_result.png

However, because we want to impress instead of emboss, we want to get the negative image instead. We’ll modify our existing command to:
convert lenna.png -type Grayscale -negate lenna_result.png
Great! But the image is 512×512. We want to downsample for lower resolution, or else generating the resulting STL will take forever in OpenSCAD. We will modify our Imagemagick command line to resize it for us also:
convert lenna.png -type Grayscale -negate -resize 128×128 lenna_result.png
However, we still need to be able to read this data into OpenSCAD. We’ll need to use Imagemagick to convert to a raw binary format, where each pixel is a number representing its brightness. We’re going to use this number to represent height. Then once we have this raw binary format, we’ll use some Ruby code to read it in and write it out in a data file that OpenSCAD can read.
To export to a raw file format with an 8-bit grayscale depth, resized to 128×128 and negated, in summary, we do:
convert “lenna.png” -type Grayscale -negate -resize 128×128 -depth 8 gray:lenna.raw
Then we can read the raw image from ruby and write it to a date file with:
# raw2dat.rb
width = 128 # => width of resized raw image
str = File.binread('lenna.raw')
pixels = str.unpack("C*")

File.open('lenna.dat', 'w') do |f|
  pixels.each_with_index do |pixel, idx|
    f.write(pixel)
    if ((idx + 1) % width) == 0
      f.write("\n")
    else
      f.write(" ")
    end
  end
  f.write("\n")
end
All this is doing is reading the each byte as a height, and writing it as text, with line breaks. Once we have the data file, we can now read it in with OpenSCAD with the surface command:
// lenna.scad
mirror([0, 1, 0]) {
  scale([50 / 128, 50 / 128, 1 / 256])
    surface(file = "lenna.dat", convexity = 5);
}
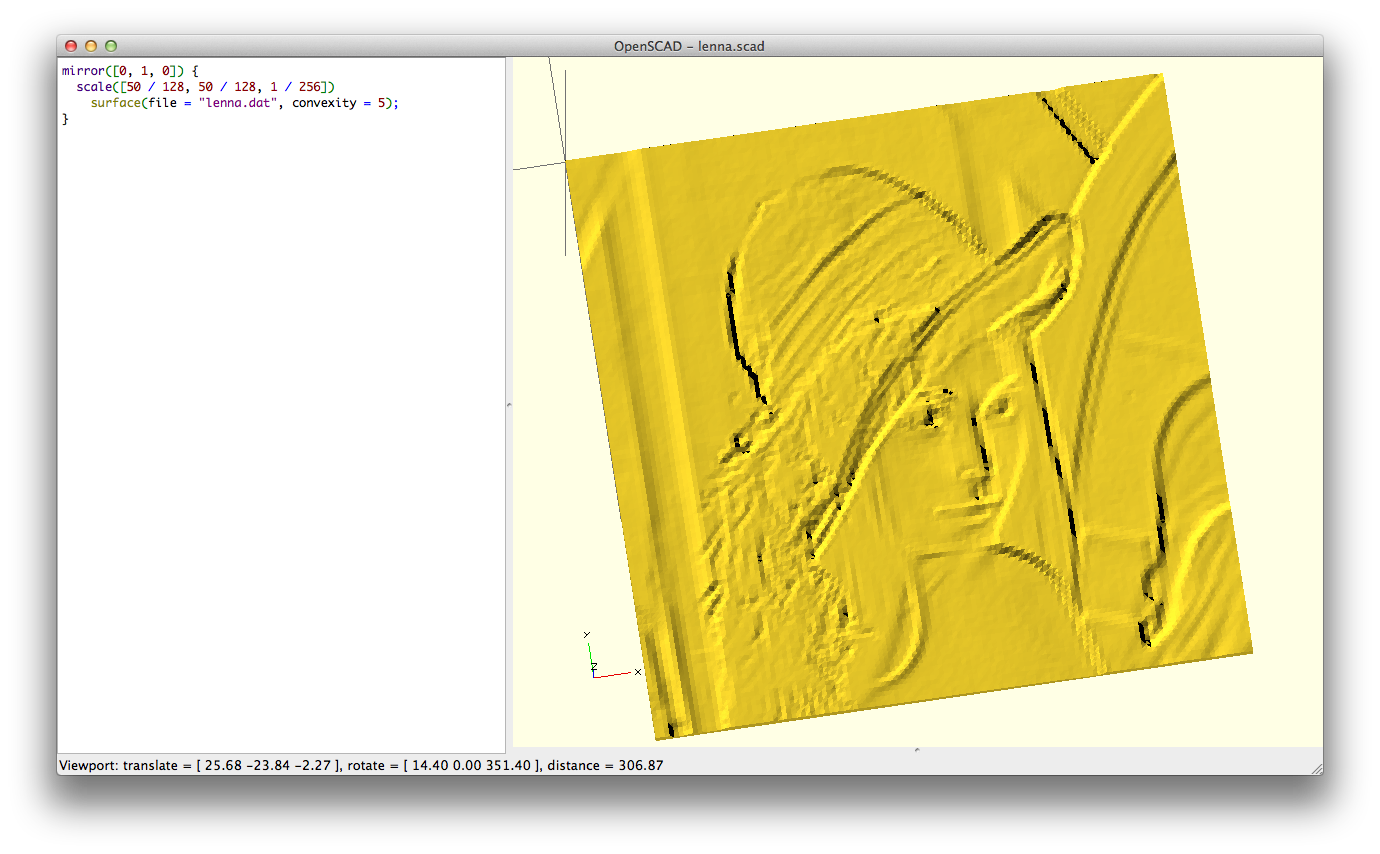
Because the coordinate system is different between screens and 3D models, we need to mirror the model. Then we scaled it to 50mm on each size, and the thickness to 1mm. The number 256 appears here, because we know we converted the image to an 8-bit grayscale, and hence, the brightness of the pixels range from 0 to 2^8 = 256. Hence, the maximum height in the raw file is 256.
I made it 1mm here, because then you can shine a light behind the plate, and the image will shine through, like the lamp this guy made. You may have to play around the thickness to get a desired brightness.
And that’s it! As a matter of course of testing out this idea, I ended up packaging up all of the above in a library called Embossanova. You can use it in one step like:
./embossanova impress lenna.png 128 128 1
Where `128 128` is the downsampled size, and `1` is the thickness of the resulting plate. More details on the README.md.
And that’s it! If you like the guide and want updates, join my OpenSCAD mailing list for updates, subscribe to this blog, or follow me on twitter.

[…] Really handy embossing in OpenSCAD tutorial from the Cubehero blog: […]
[…] shared a handy OpenSCAD tutorial: “Hi all. I wrote another guide on OpenSCAD. This time, it’s a bit more advanced, and […]
I’m unclear on whether you want to print the embossed letters on the piece of paper directly, or if you’re trying to make a stamp that does the embossing. I don’t know much about how embossing is done on paper, so this may be out of the bounds of my knowledge. I imagine you can make a stamp that shapes the paper, but I don’t know if that happens with heat treatment or not.
If you’re going to print embossed plastic letters directly on the paper, that would be do-able, but know that you’ll get the thin grooves from an FDM 3D printer. You may be able to smooth that out with a vapor bath, however, but I’m not sure how acetone treats paper.
Nice post!
If users have Gimp they can download this python dat exporter plugin I put up at thingiverse:
http://www.thingiverse.com/thing:35373
to achieve the same result as the imagemagick toolchain without having to resort to the dreaded commandline!
I saw this, i thought hey, That is cool, but i am not a *nix user, and i don’t have python installed on my laptop. so i desided to completely start from scratch and write a web app. but not just to make the surface, I want this surface on a cylinder. because that is how i roll. so if you want to make one hop on over.
camerinhahn.com/image_to_surface.html
Since I didn’t have perl installed (already had imagemagick though) I decided to create a c# script for scriptcs
using System.IO;
public byte[] GetFileBytes(string filePath)
{
byte[] ret;
using (FileStream stream = new FileStream(filePath, FileMode.Open))
{
using (MemoryStream mem = new MemoryStream())
{
stream.CopyTo(mem);
ret = mem.ToArray();
}
}
return ret;
}
var imageBytes = GetFileBytes(“lenna.raw”);
StringBuilder sb = new StringBuilder();
for (int i=0;i<imageBytes.Length;i++)
{
if (((i+1)%128) == 0)
sb.Append(String.Format("{0}\n",imageBytes[i]));
else
sb.Append(String.Format("{0} ",imageBytes[i]));
}
File.AppendAllText("lenna.dat",sb.ToString());
Since I didn’t have perl installed I created a c# script to use with scriptcs
using System.IO;
public byte[] GetFileBytes(string filePath)
{
byte[] ret;
using (FileStream stream = new FileStream(filePath, FileMode.Open))
{
using (MemoryStream mem = new MemoryStream())
{
stream.CopyTo(mem);
ret = mem.ToArray();
}
}
return ret;
}
var imageBytes = GetFileBytes(“lenna.raw”);
StringBuilder sb = new StringBuilder();
for (int i=0;i<imageBytes.Length;i++)
{
if (((i+1)%128) == 0)
sb.Append(String.Format("{0}\n",imageBytes[i]));
else
sb.Append(String.Format("{0} ",imageBytes[i]));
}
File.AppendAllText("lenna.dat",sb.ToString());
Hi there,
appreciate the guide and following the steps.
However, there seems to be a small error in the ruby file (or Ruby 2.2 has changed as it gave me IO errors, file not opened for writing) for opening the output file, it should read:
File.open ( ‘lenna.dat’, ‘w’ )
instead of File.open ( ‘lenna.datw’ )
[…] further, my OpenSCAD code is below for reference and you may also want to refer to CubeHero’s Emboss and Impress Images onto a Surface in OpenSCAD […]
ImageJ software is also allowing to save an image as a “text image” that is readable by openscad!
Thanks
Is there a way to do this onto a sphere? I’m trying to make a globe lamp, with just the outlines of the continents projected onto a sphere from a .png.